|
Safety Profile
The Safety Profile report allows you to generate and download a report of crash and/or inspection information.
To generate a report
Crash Information
| 1. | Enter the beginning date for a date range in the From Date field or click  to select a date. to select a date. |
| 2. | Enter the end date for a date range in the To Date field or click to select a date. |
| 3. | Click Yes or No to include crash detail information in the report. |
| 4. | Click Yes or No to include crash violation information in the report. |
| 5. | Click Yes or No to include driver detail information in the report. |
Inspection Information
| 6. | Enter the beginning date for a date range in the From Date field or click to select a date. |
| 7. | Enter the end date for a date range in the To Date field or click to select a date. |
| 8. | Click Yes or No to include inspection detail information in the report. |
| 9. | Click Yes or No to include inspection violation information in the report. |
| 10. | (Optional Step) Enter the maximum number of inspections that you want on your report in the Max Inspection field. If this field is left empty, all inspections that meet the remainder of the parameters entered are generated. |
| 11. | Click Yes or No to include cargo tank information in the report. |
| 12. | Click XML & PDF or PDF to choose the format for your safety profile report. Note: # Portable Document Format (PDF) requires Adobe Acrobat Reader. |
| 13. | Click  to reset the default report options. -OR- to reset the default report options. -OR- |
Click  to generate your safety profile report. -OR- to generate your safety profile report. -OR-
Click  to check the status of a requested safety profile report. to check the status of a requested safety profile report.
Once your safety profile report has been generated
Click  to save a copy of the report in XML format to your computer. -OR- to save a copy of the report in XML format to your computer. -OR-
Click  to save a copy of the report in PDF format to your computer. to save a copy of the report in PDF format to your computer.
Additional Options
First Column is Frozen
Scroll Horizontally
Scroll Vertically
Display of Records Listed in the Grid
Modify the Width of the Column
Show/Hide Columns
Sorting
View Rows in a Web Page
First Column is Frozen: The first column, the USDOT#, is frozen and cannot be hidden from the display.
Scroll Horizontally: Users can scroll horizontally to see the columns in the grid that are not visible in the display window.
Scroll Vertically: Users can scroll vertically to see the rows in the grid that are not visible in the display window.
Display of Records Listed in the Grid: At the top of the grid the system displays the total number of records in the grid and the specific records displayed in the visible window (e.g. Listing Records 25-40 of 85).
Modify the Width of the Column: Click the right edge of the border of any column and drag the border to right or left to expand or contract the column width.
Show/Hide Columns: User can display additional information or remove information by adding or hiding columns in the grid display.
| 1. | Right click in the body of any column in the grid (not on the column header). |
| 3. | Select a column to show or hide. |
| • | The Hide/Show option automatically changes to Hide if the selected column is already displayed |
| • | The Hide/Show option automatically changes to Show if the selected column is not displayed. |
| 4. | (Optional) Select Show All to add all available columns to the display. |
Sorting: Users can SORT any column in ascending or descending order.
One-Click Sorting: Click a column header (the title) to sort the data.
| • | One click will sort the data in ascending order. |
| • | A second click will sort the data in descending order. |
Menu-Driven Sorting:
| 1. | Right-click in the body of any column in the grid (not on the column header). |
| 2. | Select the Sort by menu option. |
| 3. | Select Ascending or Descending order. |
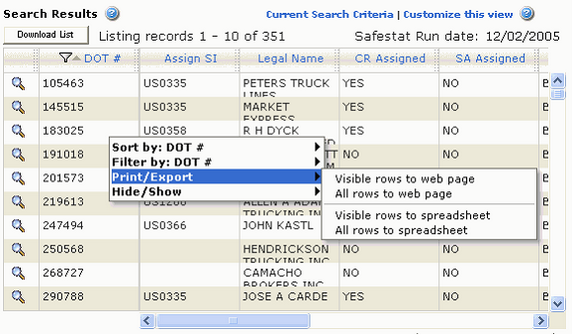
View Rows in a Web Page: Users can view selected rows or all rows in a Web Page.
| 1. | Right-click in the body of any column in the grid (not on the column header). |
| 3. | Select Visible rows to the web page to view only the current rows on a web page, or select All rows to the web page to view all rows on a web Page. |
| 